Here are more post Pacific Crest Trail evaluations of my hiking gear: food storage and cooking gear. Selecting cooking gear for my Pacific Crest Trail hike resulted in some major changes in my kit. My usual gear included a MSR Whisperlite stove, a MSR fuel bottle, stove repair kit, stainless steel pots, and a spork. This kitchen weighed in at 2.7 lbs not counting any food storage gear. My new cooking gear weighs 1.3 lbs including my food bag, hang rope, and mini-carabiners.

Cookware
I used an Evernew Ultralight Titanium 0.9-Liter Pot. The pot weighs 4.1 oz. I chose the wide-short 0.9L pot over the deep-narrow pot because the short version is more stable and water heats up faster in it (due to more surface area over the flame). Dances With Lizards carried the deep version. We preferred to cook with mine. The pot has a built in spout for pouring – nice feature preventing spills. The pot has graduations for measurements but I had to sort of remember the metric to English conversions (one cup water equals 250 ml). Sort of remember because most of the time I’d eyeball how much water I poured in, and just add more if my meal had dry or crunchy bites. If I poured in too much water I just called it soup. The handles are insulated and fold away for storage in the pack. Some hikers switch out their pot lid for one they make from aluminum foil to save weight. I did not do this. I liked the lid. Easy to put on and take off and, like the pot handles, the lid handle is insulated.
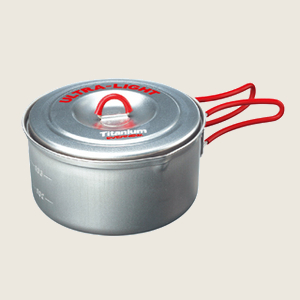
Nice not to worry about burning fingers on hot pots and lids. The pot comes with a mesh stuff sack, which I found essential for keeping the lid on the pot when stored in the pack. Especially since I also use my pot as a refuge for first day or two food treats. The pot protects avocados, nectarines, peaches, apples, muffins, donuts, pieces of pie, etc. from getting crushed.
Stove
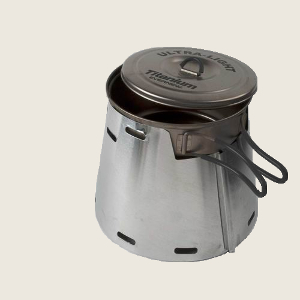
I used a Trail Designs Caldera Cone Stove System. The guys behind Trail Designs are engineers and hikers. They’re also friendly and have great customer service. We met them at the Annual Day Zero PCT Kick Off. Dances With Lizards wanted to get a Caldera Cone that fit her pot. They didn’t have any with them, but took care of getting one to her at our next resupply in Warner Springs. The key to their system is the aluminum cone that is both windscreen and pot stand sized specifically to your cook pot. This makes for efficient and stable cooking. We never had a problem with wind blowing our stove over (a fire hazard with most lightweight alcohol stoves) or a full pot tipping over. The system comes with a pop can type alcohol stove. But this isn’t your home job stove. The stove is tuned for efficient burning and has an integrated primer pan. With the Caldera Cone system, I boiled a pot full of water in about four minutes give or take using about 3/4 oz of fuel. The system also comes with a fuel bottle and fuel measuring cup, both of which I didn’t bring on the trail. The cone and stove store in the Caldera Caddy, which is a plastic cylinder made of two pieces that screw together. I also used my Caddy to store small pieces of gear including one of my lighters and my repair kit.
Fuel Bottle
I started the trail with an Equinox Alcohol Fuel Bottle. The bottle holds 8 oz of fuel and is marked in 1/2 oz increments so you know how much fuel you have left. The bottle has two tops. One is a screw top for filling it up and the other is a flip top over a dispenser reservoir. You squeeze the fuel into the reservoir up to 1/2 oz at a time so you know how much fuel you’re putting in the stove. All three of us carried a fuel bottle so we always had plenty of fuel between resupplies. However, we all eventually went to carrying fuel in a re-used 8 oz beverage container. One of the Equinox fuel bottles cracked. The others seemed to leak. I even traded out the flip top lid with a regular lid and carried the bottle in a zip lock bag, but still lost fuel. I didn’t see any kind of o-ring or gasket inside the lids and think they tend to leak while bouncing around in a pack. I think I’ll go back to using this kind of bottle, but I’m going to find lids that seal better to replace the ones that come with it. Only carrying as much fuel as you need saves weight. A bottle that you can dispense measured amounts of fuel instead of eyeballing what you pour out helps with doing this.
Lighter
Nothing special here. I carried two Bic mini lighters. One for daily use and the other as a backup in case the first malfunctioned or I lost it. I picked them up in San Diego on the way to the trailhead. Transporting lighters in airplanes nowadays is frowned upon (actually illegal).
Food Warming Pouch
A food warming pouch, also called a pouch cozy, replaces simmering when cooking. Near boiling water is poured in the freezer bag with the food to be rehydrated, the freezer bag is placed in the pouch cozy which insulates the food and keeps the heat in, and about ten minutes later the meal is ready. Saves on fuel during simmering, and saves on fuel that would otherwise be used with dishwashing water to clean a pot. Someone who is handy can make their own. That’s not me, so I bought an AntigravityGear Pouch Cozy. These are lightweight, reasonably priced, and come in a variety of colors. Mine held up well aside from some of the reflective coating wearing off. I typically rolled it up and stored it in my food bag. It was also pretty simple to clean out the inevitable spills and leaks and dry it out while in towns.
Utensils
My only utensil is a long handled spoon for both cooking and eating. I started out with a GSI Long Handled Spoon and a REI Long Spoon. The second spoon was for backup in case the other broke or I lost it. I am glad I had two along. My GSI spoon broke just a couple weeks into the months long trek. Eventually, Blaze’s and Dances With Lizard’s GSI spoons also broke. They didn’t have a backup spoon. Sad for them until we could get to town and get them a replacement.
Food Bag
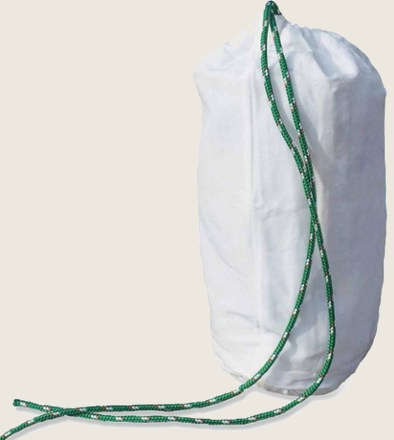
Blaze, Dances With Lizards, and I each carried an Ursak food bag (except in the Sierra Mountains where we carried bear canisters). I had a new Ursak S29 AllWhite. The girls each borrowed an older model of the same from friends. I chose the Ursak primarily for keeping rodents out of my food and because it’s so much lighter than a bear proof canister. Bears live all along the Pacific Crest Trail, not just in the Sierra Mountains. I think rodents take or spoil more hikers’ food than bears. I am confident that the Ursak would have kept a the bear from getting my food. We joked, however, that as hungry as we often felt on the trail, we would have fought the bear for our food. The Ursak is made of “bullet proof” Spectra material that is tooth and claw proof as well.
Food Hang
We each brought along 50 feet of parachord for hanging our food bags. We never hung our food. An Ursak can be securely closed and tied around a tree to keep the bear out. We used the rope as a clothesline instead. We brought along a couple Zpacks mini-carabiners each for the food hang. Instead, these were used to clip sunhats to our packs when not wearing them.
OK Ti pots are over priced, but if you want to save weight on your pot that’s the way to go. I find that 900ml pot great for winter camping when snow melting is called for.
Spring through to fall I use the Caldera Keg F or Ti 600ml short stack pot.
Thanks for the suggestions.
1L titanium pots are definitely the bomb for this trip. I like the smallish butane stoves along with the overpriced Ti pots. Very nice.